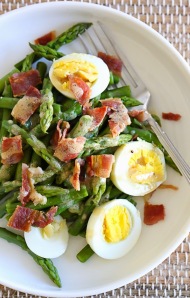
Mouthwatering Asparagus, Egg & Bacon Salad

asparagus egg and bacon salad

Happy Monday! This salad is very inexpensive to make!

It’s low-carb, high in protein and fiber and perfect for gluten-free and Paleo diets. Only takes about 10 minutes to make.


Ingredients:

  • 1 large hard boiled egg, peeled and sliced
  • 1 2/3 cups chopped asparagus
  • 2 slices cooked and crumbled center cut bacon
  • 1/2 tsp Dijon mustard
  • 1 teaspoon extra virgin olive oil
  • 1 teaspoon red wine vinegar
  • pinch salt and pepper, to taste

Directions:

Bring a pot of water to a boil, add the asparagus and cook 2 to 3 minutes, until tender yet firm. Drain and run under cold water to stop it from cooking further. Set aside.

In a small bowl mix the Dijon, oil, vinegar and a pinch of salt and pepper.

Arrange the asparagus on a plate, top with egg and bacon and drizzle with the vinaigrette. Enjoy!


Courtesy Of: http://www.skinnytaste.com

Eggs n’ things


Ingredients

  • 4 large baked potatoes (pre-cooked)
  • Salt and Pepper, to taste


  • Egg filling:
  • 8 eggs
  • 1 tsp kosher salt
  • 1/4 tsp McCormick black pepper
  • 1/8 tsp McCormick cumin
  • dash of McCormick nutmeg
  • 1/2 cup sharp cheddar cheese
  • 1/4 cup chopped onion
  • 1/4 cup chopped red bell pepper

Instructions

  1. Pre-heat oven to 400°. Spray muffin pan with non-stick spray and set aside.
  2. Shred potatoes with a cheese grater. Then fill each cup about 2/3 the way full with the potatoes and press the sides in, so the bottom and sides are covered. Add a little bit of salt and pepper to each cup. Bake for 2-3 minutes.
  3. In a bowl whisk together eggs, salt, pepper, cumin and nutmeg. Stir in cheese, onion and bell peppers.
  4. Fill the center of the potato cups with the egg mixture. If you’d like more cheese, you may add more here. You could even add bacon bits!
  5. Bake for 20 minutes or until cooked all the way through.

Courtesy Of: http://www.iheartnaptime.net

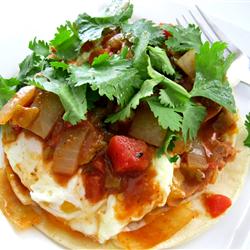
Celebrating Cinco de Mayo with Huevos Rancheros!

578209

Ingredients:

  • 2 tablespoons vegetable oil
  • 4 (6 inch) corn tortillas
  • 1 cup refried beans with green chilies
  • 1 teaspoon butter
  • 4 eggs
  • 1 cup shredded Cheddar cheese
  • 8 slices bacon, cooked and crumbled
  • 1/2 cup salsa

Directions:

  1. Heat oil in a small skillet over medium-high heat. Fry tortillas one at a time until firm, but not crisp. Remove to paper towels to drain grease.
  2. Meanwhile, combine the refried beans and butter in a microwave-safe dish. Cover, and cook in the microwave until heated through. When tortillas are done, fry eggs over easy in the skillet. Add more oil if the tortillas have absorbed it all.
  3. Place tortillas onto plates, and spread a layer of beans on them. Top with cheese, a fried egg, crumbled bacon and if desired, salsa.

Courtesy Of: http://www.allrecipes.com

Tips For Backyard Chickens

DIY Chicken Waterer Guide

DIY Chicken Waterer1.    Determine the number of DIY chicken waterer you need. A three-gallon waterer is good for a full day for about half a dozen chickens. The commercial variety is in the neighborhood of $20, but a DIY chicken waterer would only cost about half as much,and sometimes even less. You can opt for a bigger five-gallon bucket but that might be unwieldy if you need to move the bucket around. You may also need to consider the size of your chicken pen: The standard 2- or 3-gallon bucket looks more feasible in limited spaces.

2.    Choose buckets and pans that have not been used for other (toxic) purposes, to avoid poisoning your chickens. You also would need an oil pan for your DIY chicken waterer with a diameter bigger than the lid of your bucket and with a depth of more than two inches. Make sure that the oil pan has not been greased or it has been thoroughly cleaned.

3.    Drill holes into your bucket. To do this, you need to have a bucket with a tightly fitting lid. Without filling the DIY chicken waterer yet, put the lid on, and place the bucket upside down on the oil pan. Mark the height of the oil pan around the bucket so you know the maximum water level. You need to drill holes that are one inch below the water mark when the bucket is placed upside down on the oil pan (or one inch above the water mark when the bucket is right side up).

4.    Fill the container with water. Then, cover it with a tightly fitting lid and flip it upside down (this is the reason why you need to have a manageable bucket size) so the water starts flowing out of the holes and into the oil pan. Now you have a DIY chicken waterer. The principle is to keep the water flowing until it submerges the holes on the perimeter of the bucket. As long as the holes are under water, the vacuum pressure inside the bucket will prevent excess water from coming out. Water will only start flowing out again once the water level in the oil pan is below the holes. This cycle continues until all of the water has been drunk or dried up.

5.    Repeat the process for every six chickens or so. You can have one DIY chicken waterer for your entire flock, but expect that there will be competition for water and that you will replace water more frequently than if you have several other DIY chicken waterer. You can buy a more unwieldy water gallon, maybe a 5-gallon bucket, so you don’t replenish water as frequently. As long as you can manage to handle the DIY chicken waterer by yourself, a 5-gallon bucket is optimal.

Courtesy Of: http://www.chickencoopstore.net
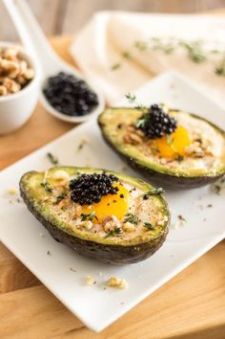
Avocado Boat Eggs

Image

INGREDIENTS

  • 1 teaspoon coconut oil
  • 1 large ripe avocado
  • 2 organic, free-range eggs
  • Sprinkle salt and pepper

INSTRUCTIONS

  1. Cut the avocado in half, remove the pit and scoop out enough of the flesh to accomodate an entire egg.
  2. Remove a small portion of the skin on the back so the avocado sits straight when you set it on the cutting board.
  3. Crack the eggs and divide them between 3 containers. Place the yolks in individual shot glasses or small tea cups and place both whites together in a common small mixing bowl. Add salt and pepper to taste to the whites and mix well.
  4. Heat coconut oil in a skillet with fitting lid set over medium high heat. Add the avocado halves, flesh side down, and sear them for about 30 seconds, or until slightly golden.
  5. Flip the avocados around and fill the cavities almost to the top with the egg whites. Turn the heat down, put the lid on and cook for about 15-20 minutes or until the egg whites are almost set.
  6. Carefully slide the yolks over the whites and continue cooking for 3-5 minutes or until yolks have reached the desired level of doneness.
  7. Transfer to a serving plate and garnish with walnuts, thyme and balsamic pearls.

Courtesy Of: http://www.thehealthyfoodie.com